Conor
-
Posts
216 -
Joined
-
Last visited
-
Days Won
9
Content Type
Profiles
Forums
Enhancement Requests
Everything posted by Conor
-
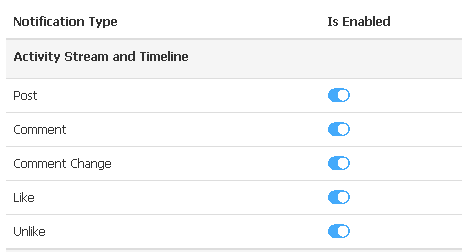
Hi @Lyonel I have just tested this too, there is a separate setting for mobile notifications which will not make those settings available via a PC browser so make sure it is not the mobile one firstly. Secondly there is an optional setting, this again will not make a difference to whether you can turn those settings on or not. It will only need a refresh of the page to enable so you won't need to log out and log in to test it, and to make sure we are seeing the same thing I have put a couple of screen shots below. These settings: Are giving me these options (for the like / unlike bit): Are these settings the same in your system? Thanks Conor

-
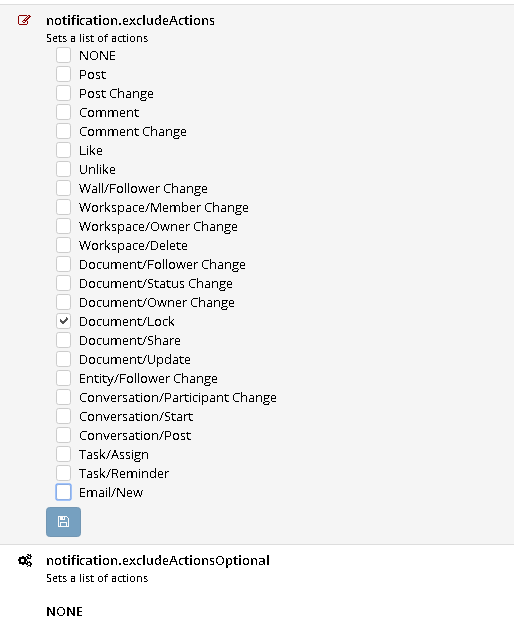
Hi @Lyonel This is controlled in the admin portal under Home > System> Settings> Advanced and the setting is notification.excludeActions. Anything ticked under this setting will not be available on the user profile notification settings. Hope this helps. Kind regards Conor
-
AD Groups in Hornbill/interacting with User records through BPM
Conor replied to a topic in Service Manager
Hi @Paul Alexander Apologies I completely missed this. There was a new release of the LDAP user import script released yesterday which may help you with this too, all details and necessary files can be downloaded from here - https://github.com/hornbill/goLDAPUserImport Ok so there are 2 methods I would use to import multiple AD groups - either to match the names of the groups in AD to the names of the organisations in Hornbill, or to split the imports up and hardcode the group names. The first method is the easiest but requires your AD data to be up to date and spelt correctly. In AD each customer will need an attribute that specifies which group they are in i.e. finance in the Department field. If the organisation in Hornbill is also Finance then the orglookup function in the import script will simply match the AD string with the Hornbill group and that customer will then be automatically linked to the Finance department. Providing all the organisations in Hornbill match the all values in the department string in AD then all customers will then be linked automatically to their relevant groups. The latest import script will automatically remove previous associations if this changes in the source (AD), and add the customer or user to the new group as specified in AD if necessary. The second method involves creating multiple import scripts, and rather than using a variable for the orglookup i.e. department, it will use a hardcoded value. Any value in the mapping that has square brackets [variable] will use the variable from AD, and any value that has Quotation marks "hard coded" will be the string that goes in for every customer imported on that script. So this method will be more exact, but there may be more import scripts to manage. To set this up I would use the filter at the top of the import script to only select users from a particular group in AD, or use the DSN search root that will only select users from a particular group. Either way you will only be looking at a subset of customers in your AD per import script. In that import script then hard code the group that every customer in that script will be part of by putting the group name (that will need to match the group name in Hornbill) in quotation marks in the Atrribute bit of the orglookup function at the end of the import script. This will mean that every customer that is imported in that script will then be a part of that organisation. You can have as many scripts running each hour/day/week as you want, but remember that each user will have their group set on the last import that runs - so if I was in 2 different import scripts for whatever reason, then I would be a part of the group specified in the last import script that runs with me in it. In theory all customers should be imported in different scripts, so this shouldn't be an issue, but if you do need multiple group associations then the latest import script can cater for this with the "OnlyOneGroupAssignment" function in the orglookup bit. Either method will enable you to import multiple groups, but it sounds like you will need the second method so you can definitively put that group of AD users into this Hornbill group. You can also filter the source down to one user record (using the filter or the DSN at the top of the script) to test how it works first before rolling it out to multiple users and groups, but it is straight forward once you have set it up once because you can then use that tested script as a template and tweak the filter/DSN and the hardcoded group names. I hope this helps, lots of detail but this will give you the outcome you are looking for (and anyone else with similar requirements). Kind regards Conor -
AD Groups in Hornbill/interacting with User records through BPM
Conor replied to a topic in Service Manager
Hi @Paul Alexander Most of these things are possible within Service Manager, so I will run through these first, but then the process may need looking at to get it to work for you. Firstly you can get the AD groups into Service Manager. Using the LDAP import script you can import different groups into different departments, or any other group you wish which will store each group in Service Manager in the same way as your AD. If the names in the AD groups are the same as the ones in Service Manager then they will match up, or you can split the ldap import script into multiple scripts so that each one only looks at a particular AD group and the department (or whichever type of group you choose) will be hard coded so everyone in that import will be added to the group hardcoded into the script and the group names can be different (and you then have multiple scripts of course). Using the BPM you can query a users details using the get information automated task node, so providing the details have automatically updated into a custom field for example from your daily LDAP import, then your bpm can query that and make the decision you require during the BPM lifecycle. Step 3 is where it gets tricky, because the ticket needs to be logged before the BPM can start. However, if all finance members need to read and accept this policy every year, I would recommend simply emailing the relevant details to the entire team which can include the catalogue item that they will need to go through to read and accept. By logging the call each team member will be confirming that they have read and accept the policy for that year. I would always recommend that you leave the users as read only within Service Manager, because the LDAP import will overwrite them the next time it runs anyway. So once a team member has logged the call it will get passed to yourself or another member of your team, and then the task will be to update the relevant value in AD (if you even need this). Alternatively as this is simply to make sure that they have done this, you could just run a report or configure a view/chart on your personal request list dashboard to see who has not logged a ticket against that catalogue item from that team, and this will give you the same information but very quickly and easily. So it is possible in Service Manager absolutely, but I would recommend simply emailing the entire team with a link to the catalogue item (this can be via the system or not, whichever is easier for you) and then simply report on who has not logged a call against the catalogue item. Once everyone has logged against that catalogue item then that catalogue item can be hidden until the following year when the process has to start again. As you already know the tickets that have been logged will be there forever more, so you can easily pull back the confirmations for every year and team member if required to do so. Just the way I would do it to keep things simple and repeatable, but as DeadMeatGF mentioned there are other tools available which may work better for you. Maybe even a combination of Service Manager and Document Manager? The choice is yours - let us know how you get on -
Hi @Paul Trenter @Martyn Houghton is exactly right - the from address does not match the name of the shared mailbox in question. I have just gone through and tested it myself and it seems that the problem is not with the config but with the test email address being hardcoded as 'do-not-reply@live.hornbill.com'. Firstly I have also gone through and tested the email configuration within the application and that does work correctly, you will be able to continue sending emails out of the system, it is just that the testing SMTP section has the from address hardcoded, which needs to be changed by us. So you can continue working because your mailbox will send emails out, and thank you for pointing this out this will be raised and fixed asap. Thanks Conor
-
Ok, thanks for giving it a go. As I say I will chase it up tomorrow, so I will be in touch asap Thanks Conor
-
Hi @chrisnutt Just thinking out loud, I've been away for a long weekend so finally had a couple of seconds to think! If you tried exactly the same script twice, once straight after the other, does that work by any chance? The script creator is apparently back tomorrow so will be able to get something in there to figure out the problem, but in the meantime I was thinking that maybe it is something to do with the cache and that all the info is not there to start with.... Just a thought, but worth a quick try. As I say I will bug the creator tomorrow as soon as he sits down to try and figure this out, but if you have a second can you try and run that script twice in succession? Thanks Conor
-
Hi @chrisnutt Thanks for trying that. Can you please attach the log file that will be in the folder with the executable. Obviously it is not the data, so hopefully the log will shine some light on what is happening. The one from this afternoon may be a bit light with only the one user imported, so the one from the initial test yesterday might be best? Probably best to PM me the log file in case there is any sensitive info in there. Thanks
-
Hi @chrisnutt I have had a look at the import script and it filters out the CN=, OU=, etc. so it will be left with the first group i.e. CNutt. That value is what is then used to search the rest of the users for the relevant ID, so I am pretty sure the regex is not the problem. If changing that value didn't work then it will be something simple, but we will need to run a couple of tests. The first thing to rule out is the data, can you update the Filter at the top of the conf file with the ID of the person in the above screenshot, so it looks something like this (but obviously replace stevenB with the ID of the person in your team): "Filter": "(sAMAccountName=stevenB)", This will limit the import to just this person, and then can you also put the manager value into one of the attribute fields. So one of your attribute values will look something like this: "Attrib8":"[manager]" This will put the manager value into the spare field so we can see what the script is working with. Give this a try and let me know what the value in attrib8 for that user is, and we will hopefully rule the data out as a potential problem. Thanks Conor
-
Hi @chrisnutt I am not 100% on this one but looking through my guess is that you need to set the 'GetIDFromName' to false. From what I can see, you are currently searching on a full name, whereas if the value you are returning is a username then that will not match. So by turning the getIDFromName value to false it will then just search on the ID, which will match the correct username. Just tried on our AD, in ours the DSN starts like this: CN=Steven Boardman,OU=HSL Users, So the regex against that string will return Steven Boardman. In your case though (if I understand this correctly) it is returning C.Nutt. So if the GetIDFromName value is true then it will search all users in your instance for C.Nutt in the Full Name field, which it will not find, and then it will try to put the ID of the record (if it did find one) into the manager field. If you set that value to false then it will just search for the ID based on the string the regex returns, rather than the full name field. So in your case it will search for the ID of C.Nutt. Give this a try and let us know how you get on. Thanks Conor
-
Hi @chrisnutt Hope you are well firstly. I agree the post mentioned above is a good one, but I have also attached an example you can import into your instance as a template if that helps. Thanks Conor answers-report.report.txt
-
Hi @SJEaton The individual workflows are not saved anywhere automatically. The entire system is backed up regularly, but in the case that the backups were ever needed (which shouldn't ever happen due to the replication meaning if a problem occurs at one data centre your service will switch to another so your service will continue uninterrupted) the backup would restore the entire system rather than just specific processes. For each individual workflow that you would like to back up I would recommend 2 options - Copying them or downloading them. To copy a workflow go to the relevant section in the admin tool, hit the copy button and label the copy accordingly. This will mean that there is a backup ready to go whenever it is needed. To download a copy of the workflows you want to keep, open up a workflow and in the top right there are download and upload buttons, click the download button and this will produce a txt file (I believe) which can then be re-imported at any point to replace an existing process or auto populate a new one using the upload button. Both of these features are available for both business processes and progressive capture flows, and are definitely the simplest way to back up individual workflows. Hope this helps Conor
-
Active Directory Import
Conor replied to Lee Humphreys's topic in Integration Connectors, API & Webhooks
Hi @Lee Humphreys The import script will update the user record that is already in place if anything has changed in the source. If nothing has changed then the user account will remain the same. There are options to say whether you only want fields to be set when a user is created, updated or both, but generally these options are set to both so it will always reflect what is in the source. All of these are listed in the wiki page too: https://wiki.hornbill.com/index.php/LDAP_User_Import. Thanks Conor -
Shared mailbox default address - how is it added?
Conor replied to lee mcdermott's topic in Service Manager
Hi @lee mcdermott You can set up the default address on the Addresses tab a couple along from the tab you are on in that screenshot. You can set multiple addresses if you like, and then decide which will be the default. In most situations you only need the one address though. Hope this helps. Conor -
Hi @Dan Munns This is the flip side of the import - it will never remove data, only update or insert. For attributes against a record such as mobile number for users, or location for an asset, these values will be updated if different in the source but never removed if the value is not in the source anymore. For multiple values, such as team membership where a user may be a member of different teams then it will not remove them from those teams, but it can add a user to multiple teams. So the import will never remove a user from a group if that has changed in the source. Fortunately it is incredibly easy to do this manually in Service Manager via the admin tool. Go to Admin -> System -> Organisational Data -> Organisation -> Authorisers, and from there you can simply select each user that does not need to be in the team anymore on the left and then hit the delete button on the top right. There will be a prompt to confirm if you want to remove those users from the team, hit yes and the selected users will no longer be a part of that team. In a nutshell the addition of users to a team can be managed automatically via the AD import, but it will never remove users from a team automatically. As you will see though, it couldn't be much easier to manage manually in this case. Thanks Conor
-
From the wiki page https://wiki.hornbill.com/index.php/LDAP_User_Import one thing I should point out is that the value in custom field 1 should match the name of the team in Hornbill: OrgLookup The name of the Organization in Hornbill must match the value of the Attribute in LDAP. Action - (Both | Update | Create) - When to Associate Organisation On Create, On Update or Both Enabled - Turns on or off the Lookup of Orgnisations Attribute - The LDAP Attribute to use for the name of the Site ,Any value wrapped with [] will be treaded ad an LDAP field Type - The Organisation Type (0=general ,1=team ,2=department ,3=costcenter ,4=division ,5=company) Membership - The Organisation Membership the users will be added with (member,teamLeader,manager) TasksView - If set true, then the user can view tasks assigned to this group TasksAction - If set true, then the user can action tasks assigned to this group.
-
Hi Dan The simplest way would be to copy the existing import script, change the LDAP filter to only look for users with 'authoriser' in the custom field in the copied import script (or a wildcard if there may be multiple values in that field), and then map the custom field value into the OrgLookup function at the bottom of the copied import script and schedule it shortly after the existing import script. This will mean that each user that has the custom field populated with authoriser in AD will be automatically added to the authoriser team when the second import runs, and the first import will have already added them to their day to day team/dept. Any existing details on the user record will remain unless they have changed in between the scripts running, in which case they will be updated. One of the developers may have a way of managing it in the one script, but this method will be very easy to set up and manage moving forward. Hope this helps! Conor
-
Firstly for the people working from mobiles it may be easier for them to be assigned activities from the process rather than the overall request, this will mean that there is no need to switch between linked requests etc. and the parent request details can be passed through to the tasks so that they can still see the customer, site, summary, etc. as well as any progressive capture answers that may be required for that particular task without having to switch between linked requests - everything you need for that bit can be found here: https://wiki.hornbill.com/index.php/Request_Variables In terms of passing the detail through to the change via a linked request without needing to rekey everything - this will only be possible using the same request variables method details above and passing everything required into the summary and description field of the main request at the moment. It is an interesting point and one of the product owners may have a comment about this, but the way I can see of getting that detail across would involve a node in the process to get request information, and then setting whichever variables you want to pass through to append to the existing request description so that when a linked request is raised all of that detail will then be in the summary and description fields, and automatically copied across. As long as it is set within the update node to append = yes nothing will be overwritten, and all the question and answer values as well as the request details (customer, site, etc.) will all remain where they are, but copied into the request description too. I have drawn and attached a 5 second process to try and highlight what I mean because it isn't as easy as i thought it would be to articulate You could have a task in the existing process asking the owner of the request if they need to raise a linked change, and then a decision node to say if the answer is yes then add these variables to the description, and then another task to the owner to complete when the linked request has been raised so the existing process can carry on / go on hold / update a board/workspace if applicable... pass-through-details-example.bpm.txt
-
Hello there Great news you want to expand into Change Management, in my experience it is straight forward once you have ironed out your process, it is just deciding how you want it to work. Changes cannot be raised from the Service Portal firstly, only Incidents (something is broken) or Service Requests (something is wanted). Change is an internal process that may address one or many Incidents or Service Requests, but it will always be driven by the internal team rather than the end users. Firstly you will need your change process configured in the BPM of the admin tool. Once you have these (can be one for both IT and facilities, or separate processes - whichever works best for you). Then you will need a service to drive these changes through. You will already have a request catalogue, so it is up to you whether you would like changes created against the same services that you currently offer, or via a new service. If you already have a facilities service for example, then you can set up the change process to run underneath that service via the service configuration -> request config -> Change, and this will run in parallel with any existing Incident / Request processes that may already be configured. So to answer your specific points it will be the service that distinguishes between IT and Facilities (that is the way I would recommend anyway) and then if you have different processes / teams involved then the changes will be clearly partitioned. In terms of scheduling the change form has an extra analyst action at the top (next to the resolve button) to schedule the change. Once a change has been scheduled in there then it will appear in the Change calendar. Each analyst that will be logging changes, resolving changes, and viewing the change calendar will need the appropriate rights added to their analyst profile if they are not there already, these will all begin with Change in the roles section of the analyst profile to make it simple. Once you have got this far then you can start experimenting with other additional features such as the boards for an always up to date birds eye view of all the changes currently in play, or a change workspace to push out key updates automatically to interested parties. I have attached my Change Process as an example, which you are welcome to import into your BPM in the admin portal and use as a template for your process(es) moving forward. Lots of information there, but give it a try and let us know how you get on. Thanks change-process.bpm (2).txt
-
Hi Derek, The raise new button by default uses the 'new request' Progressive capture. To change the progressive capture flow you can update the app.itsm.progressiveCapture.newRequest setting in the admin portal -> Service Manager -> Settings -> search for the above setting -> add in the name of the progressive capture flow that you would like to use instead. Alternatively you can update the new request PC flow, although just so you have the original copy I would personally recommend copying the new request progressive cature first. The process that gets called is the process defined against the catalogue item per call class, per service, or if there are no catalogue items the process defined in the workflow drop down against the service (per call class again). If there is no process defined, or if a service was not selected during the logging process then there is another setting to change the default process when an incident or service request gets logged - app.requests.defaultBPMProcess.service and app.requests.defaultBPMProcess.incident. Again simply change the name to the process that you would like to set as default, or copy and update the default process. Hope this helps. Thanks Conor
-
Hi Derek This sounds like it may be to do with the team membership rather than the rights, the process may have assigned the request to a particular team and the new user may not be a member of that team. Is the team name Service Desk and you have assigned the new user to that team? Thanks Conor
-
Conf.json putting word 'description' into job title
Conor replied to derekgreen's topic in Service Manager
Hi Derek It certainly should not be working like that, can you attach the latest LDAP log file to this thread so we can see if there is any debugging info in there? Thanks -
Hi Andy Can you log in as administrator on the admin.hornbill.com portal, go to System -> Data -> Database Direct and copy and paste in the below query. Please change the limit (just under the query box, but above the results) to 1000 from 25. It could just be that the date that the tickets were resolved are before the start of the date range added into the report. This query will show all the tickets that James has resolved since you started using the system. If you look at the dates in the date resolved field (the most recent will be at the top) do these dates and times correspond to the dates and times provided against the reports? The data will be in the database, but if the last call James resolved was in September, but the report is only looking at calls resolved since the start of October then they will not show on the report. If you then try it the other way around and the last call James resolved was in September but the report is for all calls since August, James' calls will be in the report. Give this a try and if you still cannot see the calls in the report let me know and we will set up a remote session to look in more detail and get it sorted once and for all. SELECT h_pk_reference, h_summary, h_status, h_dateresolved, h_resolvedby_username, h_resolvedby_teamname FROM h_itsm_requests where h_resolvedby_username = 'James Southall' order by h_dateresolved desc Thanks Conor
-
Hi Andy Thanks for this, that worked fine I can import it in no problem. Just to confirm when you say you have de-provisioned your user, you have archived the user in Service Manager? The report looks fine, I ran it once without changing anything and then ran it again after archiving a particular user and the tickets against the archived user are still appearing in the report. To be fair it shouldn't make a difference to this report other than if the user was removed from Service Manager then the user ID field will be blank... So you did mention that the user still has an active account in Service Manager, but you cannot see that user against any of the tickets on the report anymore? Thanks Conor
-
Brilliant thanks for confirming, can you please export the report definition file from the report in admin tool so I can import it into my demo system and compare results. If I can see anything obvious I will update and send it back, otherwise I may need to ask for some further info to make sure we are on the same page. To export a report click on the blue down arrow in the top right of the individual report, and that will download a .xml file, you can drag the file to your post on here. Thanks Conor